Continuous integration (CI) servers coordinate a wide variety of activities, such as checking out and building new versions of code, running tests, and deploying software. These integrations are handled by automated build and testing systems, which means that your developers are alerted to issues such as code clashes or broken unit tests as early as possible.
The most popular CI tool today is Jenkins. Jenkins is an open-source, server-based system that provides a straightforward platform for automating build testing and integration and for supporting a wide selection of version control systems.
I'd like to share some practical guidance for building and deploying applications using Jenkins, including plugins, which support and extend Jenkins capabilities, making them a vital tool when building your integration and delivery processes.
Creating and scheduling jobs
Jobs are the runnable tasks that are controlled and monitored by Jenkins. Examples of jobs include compiling source code, running tests, provisioning a test environment, deploying, archiving, posting build jobs such as reporting, and executing arbitrary scripts.
In a few steps, I will create a job that builds a Java project using the Maven build automation tool. Maven allows developers to automate the process of creating an initial folder structure for a Java application and performs the compilation, testing, and deployment of the final product.
For the purposes of this article, our project will include a job that pulls the latest code from the repository and builds it. You could extend this example to run some tests, and then deploy and start the application on a test server.
Executing the build
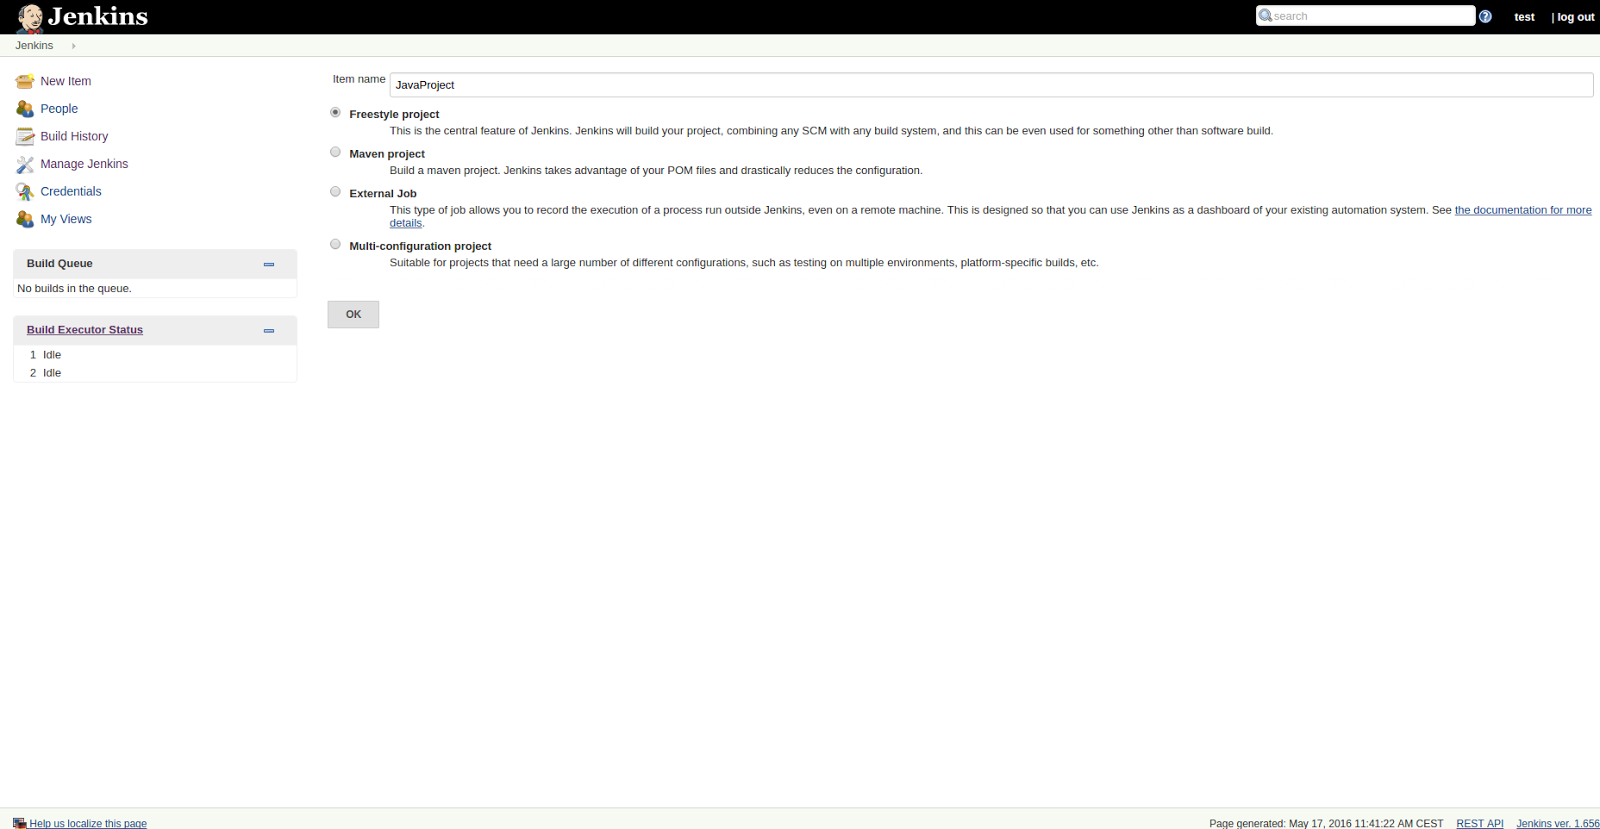
The first thing you need to do is install Jenkins. After clicking the Create new jobs link on the Jenkins dashboard (when there are no other jobs there) or clicking on New item in the left menu, you will see the form for a new job.
This form is relatively simple. You will need to enter a name for the job and select the purpose of the job. Jenkins has a preconfigured Maven project that we could use, but for the purposes of this article, we're going to use the Freestyle project, to illustrate the full range of options and flexibility available for building complex jobs.
Click to enlarge any images
After selecting the job type and name, the next step is to configure the job. The first section I will configure is the source code management section—where my project is located and where the repository is—to pull the code and start the job. In this case, I selected Git as the source code management system, so I need to enter the Git URL in the Repository URL field. If your repository isn’t public, you’ll need to add your credentials in order to allow Jenkins to access your project/repository’s source code. In the Branches to build field, enter the branch name that you want to use to build the project:
Next is the Build section. Click on Add build step and select Invoke top-level Maven targets. Select the Maven version from the combo box and add Maven goals in the Goals field.
Schedule
With Jenkins, you can schedule jobs to run every so often to support the build automation process (e.g., nightly build and deploy). The build can be triggered in several ways: whenever code is checked in, or at preconfigured times or time intervals, using Linux cron syntax, as shown in the screenshot below. The configuration setting for build triggers is located under the Build Triggers section of the job configuration page.
One common way of triggering a job is to commit a change to a repository. This means that when a developer finishes a development task and pushes their changes onto the project’s repository (e.g., the Git push command if you're using Git), the job will be automatically triggered. An easy way to do this is via the GitHub Jenkins plugin.
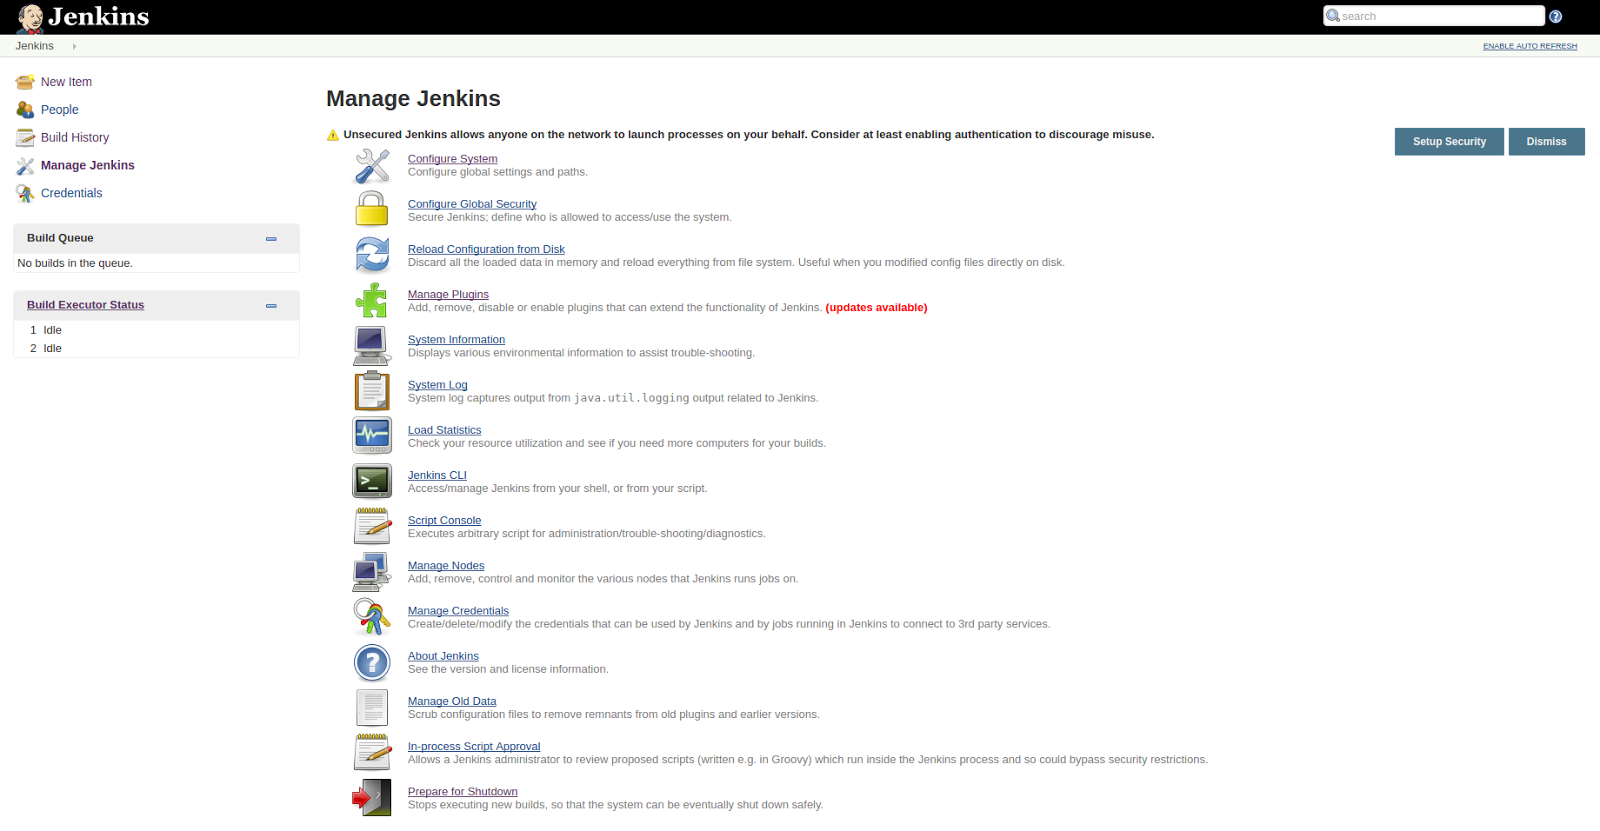
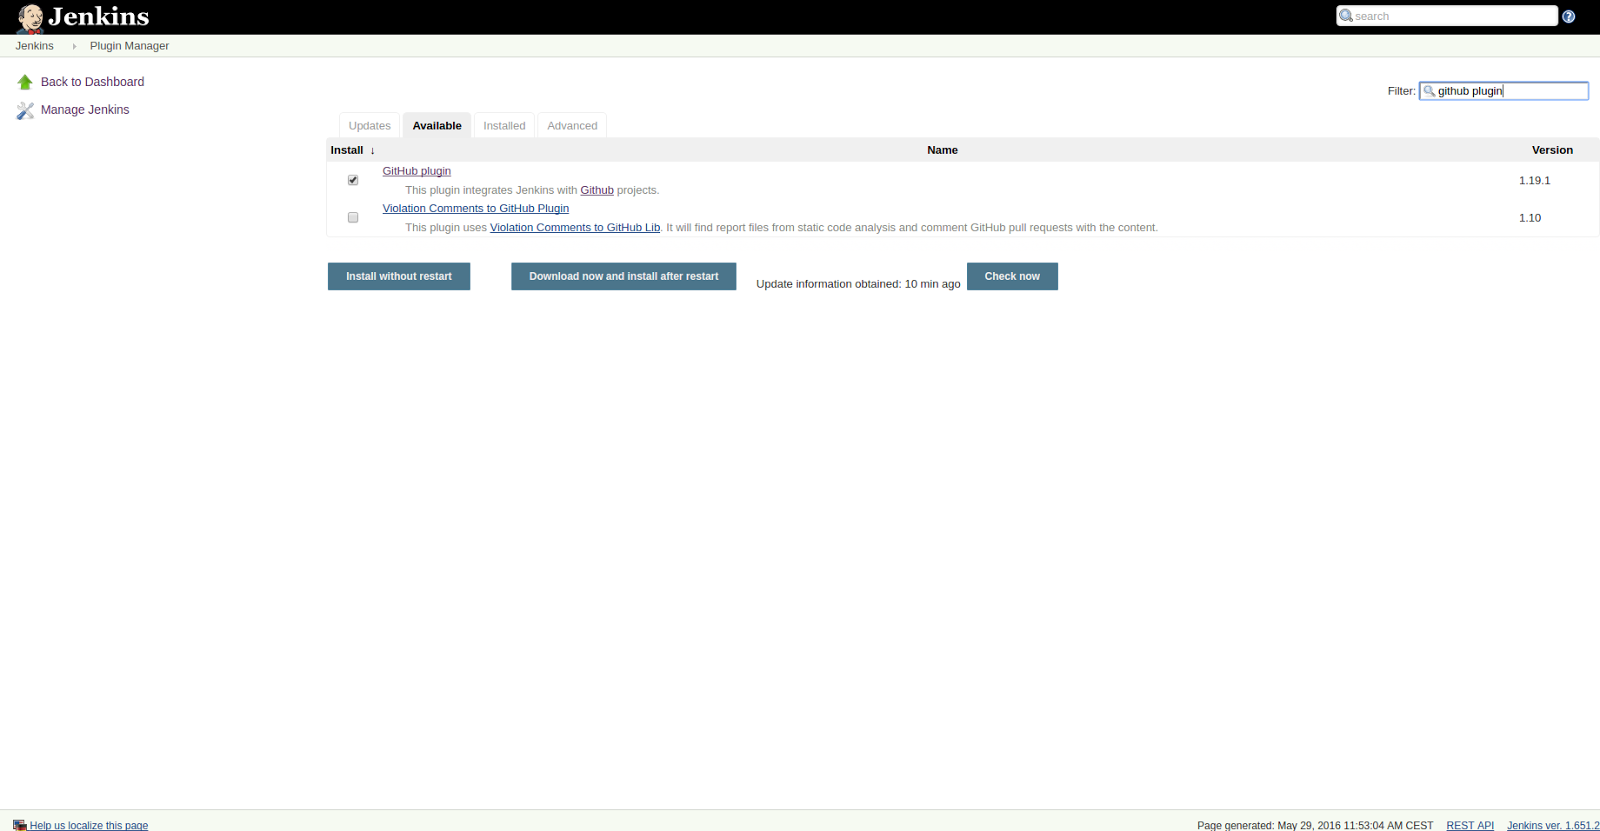
Jenkins plugin installation is done via the Manage Jenkins section, as shown below. The Manage Plugins option is responsible for adding, removing, enabling, and disabling the plugins. You can locate the plugin you want to install by typing its name in the "Filter" field. After selecting the plugin, you can click Install without restart to use the newly installed plugin immediately.
Once you have the GitHub plugin installed, a new option, Build when a change is pushed to GitHub, will appear under the Build Triggers section we discussed above.
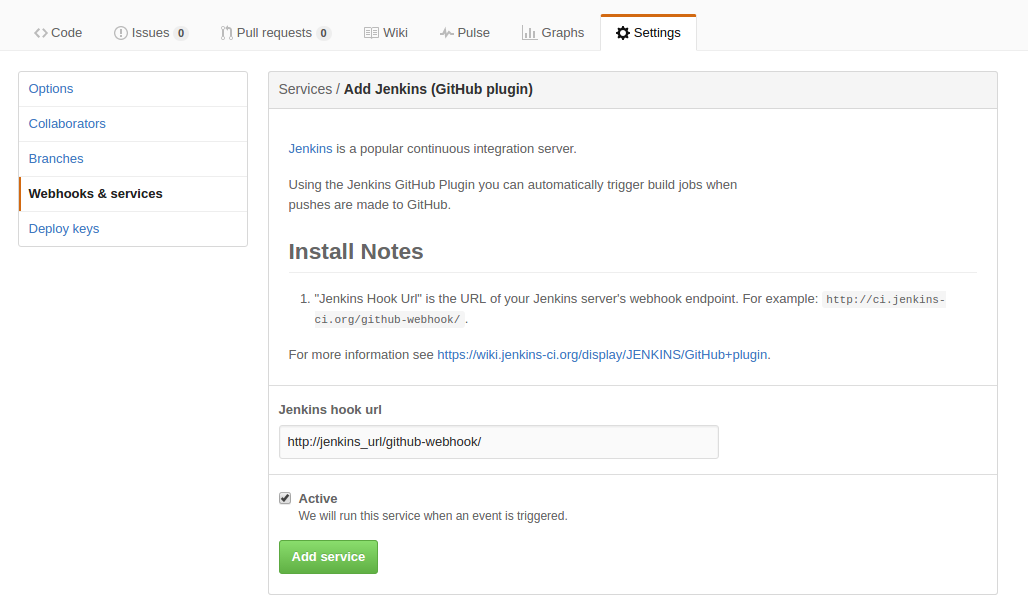
In order to complete the Triggers configuration, the webhook, which allows you to build or set up integrations that subscribe to certain events on GitHub.com, needs to be added. Go to your GitHub repository and click Settings (see the image below). Click Add Service and find Jenkins (GitHub plugin). Enter your Jenkins URL in the Jenkins hook url field (see below).
Ensuring a robust Jenkins deployment
The following practices are important if you want to run a robust Jenkins integration server that won't break down.
Secure your Jenkins servers
Jenkins does not perform any security checks as part of its default configuration, so always ensure that you authenticate users and enforce access control on your Jenkins servers. Due to Jenkins’ important role, a breach of your Jenkins servers can mean a loss of access credentials to your most valuable resources and other potential risks such as unauthorized users kicking off malicious builds and jobs.
Be cautious with the master(s)
Jenkins supports a master/slave mode where the workload for building projects is delegated to multiple slave nodes, allowing one Jenkins installation to host a large number of projects or provide different environments needed for builds/tests.
In a large, complex integration environment that includes multiple users that configure jobs, you should ensure that they are not running builds on the master with unrestricted access into the JENKINS_HOME directory. This is where Jenkins stores all of its important data.
Instead, you can use the Job Restrictions Plugin to limit which jobs can be executed on the master. You can also use multiple masters and restrict each to a specific team.
Backup configuration
In order to make sure all configurations and activity logs will be available when needed, you can use the thinBack plugin. This plugin backs up Jenkins’ global and job-specific configurations and can be scheduled for automated backup of only the most critical configurations.
You must regularly test that you can restore your system from the backup; otherwise the backup serves no purpose.
Free up enough disk space
Jenkins needs disk space to perform builds, store data logs, and keep archives. To keep Jenkins up and running, make sure that you reserve 10 percent or more of the total disk space for Jenkins in order to prevent fragmentation (which may result in operating system performance degradation, for example). In most cases, mounting network drives and sharing the specific folders is sufficient to fix such issues.
You can use the Disk Usage Plugin to monitor your project usage trends and the remaining allocated disk space. Also, large and complex architectures always include monitoring tools in the integration and delivery systems. Installing lightweight tools such as Nagios or Zabbix can help with logging and monitoring Jenkins, and they will not harm its performance.
Version 2.0 will make CI even easier
In the new 2.0 version, Jenkins offers pipeline as code, a new setup experience, and several UI improvements. The Pipeline plugin introduces a domain-specific language (DSL) that helps users model their software delivery pipeline as code. Jenkins 2.0 will also help you choose the plugins that match your needs. Other improvements and redesign enhancements can be found on the official Jenkins 2.0 website.
Using Jenkins to implement your CI is simple, and it is the most common tool for providing CI servers in modern R&D environments. We encourage you to get involved and join the great Jenkins open-source community. You can contribute your own plugins, fix bugs, and share the fixes with the community, or stay tuned to Jenkins mailing lists and the IRC Channel.
Image credit: Flickr
Keep learning
Take a deep dive into the state of quality with TechBeacon's Guide. Plus: Download the free World Quality Report 2022-23.
Put performance engineering into practice with these top 10 performance engineering techniques that work.
Find to tools you need with TechBeacon's Buyer's Guide for Selecting Software Test Automation Tools.
Discover best practices for reducing software defects with TechBeacon's Guide.
- Take your testing career to the next level. TechBeacon's Careers Topic Center provides expert advice to prepare you for your next move.


